Welcome to the North Shore Tying Company, If you are interested in having flies tied please visit the "Flies" pages on the right side of the screen. Due to the massive amounts of fly patterns available today there is a chance that the flies you need may not be listed, if so please contact me and I will do my best to meet your request.

Friday 28 December 2012

D.I.Y. Dubbing Brushes

Hey Everyone,

So I thought I would take some time while on holidays and show you how to make your own dubbing brushes.

When I say dubbing brush most people think of a stick with some velcro on to brush out dubbing, but a dubbing brush is a pre-maid section of thin wire with material spun in between it.
Basically it is a pipe cleaner with different material spun between the wire.

So I will take you through the process of making your own dubbing brushes, in this brush I will be using Bucktail for the material. Bucktail is a great material to spin if you want to tie larger flies for warm water and salt water species.

Hopefully the pictures are easy to understand, if not just shoot me an email and  I will help you out, I did finally get a new camera so this will be my last post with this camera, I will probably be making a video in the near future on dubbing brushes to help clarify the process.


Firstly you will need a small board, here I use a simple piece of pine board with a screw into the wall to wrap the wire around.


Here is a close up of how I wrap the wire around the screw, there is a small piece of dense felt that I use with the screw to hold the wire more secure.


I then lay the wire across the board.


I use a rotary tool to spin my brushes, you will have to make some sort of hook to put into the tool to hold the wire, I use a paper clip and it works great.


The next step is preparing the material to spin in the brush, as stated earlier I am going to use Bucktail for this brush, make sure you comb out the under fur in your material, if you don't then your brush will be very thick and will look to bulky when you wrap it onto your fly. 


Here is how I lay out my material, I like to use a shorter/darker section of fur near the end of the brush, this dark section will be wrapped near the head of the fly and will give the fly a tapered look because of the shorter coloured material.


The next step is to wax the other section of wire with some tacky wax, then lay the wire on top of the material, this will "sandwich" the Bucktail between the wire  and will help lock the material onto the fly. Then just wrap the other end of the wire around the same hook you first wrapped it around.


Now you are ready to spin the brush, I use a rotary tool for this because its easy and fast. Its important that you start slow, this way you can make sure the material isn't tangling up when you start to spin it. When you are happy with the way the material is spinning, then you can go faster, you can just keep spinning the material until the wire snaps. The material will snap at either the rotary tool or the screw.


When the wire snaps you will be left with a perfect dubbing brush.


Lastly all you need to do is brush the hairs all to one side. 


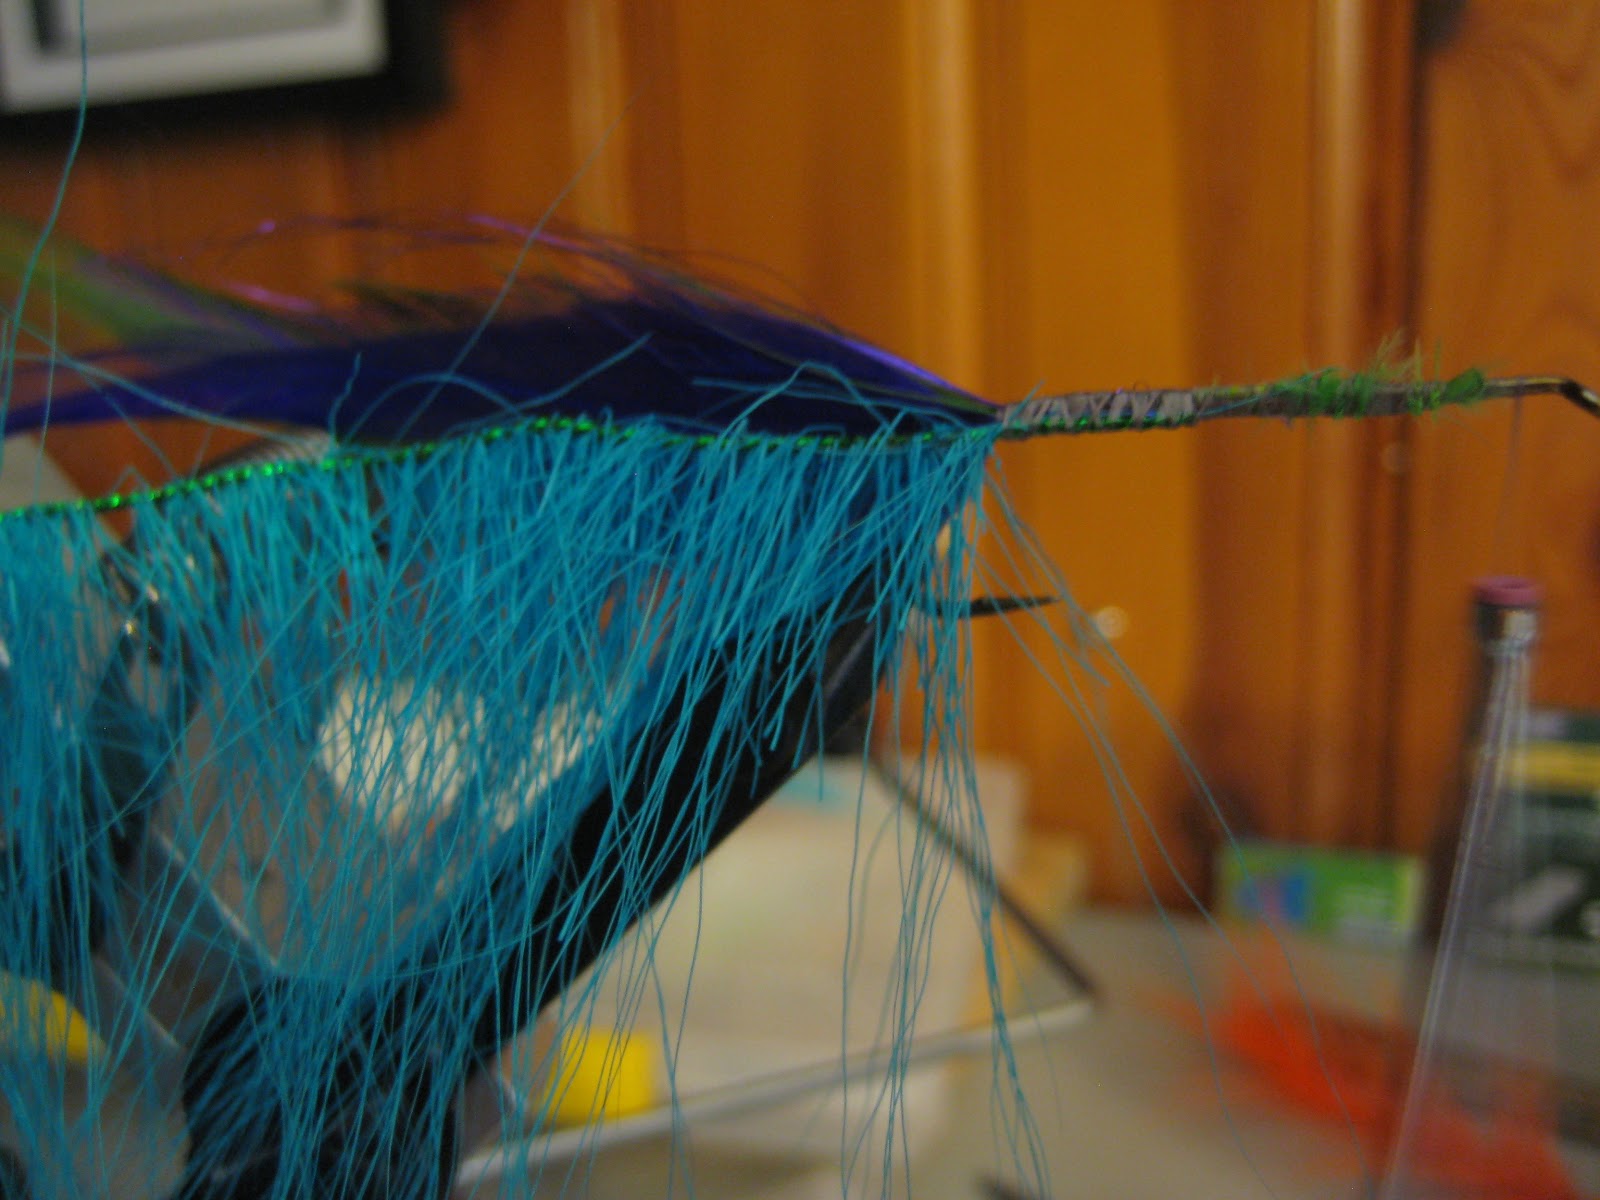
Here is an example of a really simple pike fly that is tied with the dubbing brush that was just made. The tail on this fly is just a couple purple and green hackles, then tie in the dubbing brush. Make sure you tie in the end with lighter and longer hairs first, so that the dark short hairs will end up at the head of the fly


Then wrap the brush forward while folding the hairs towards the back of the fly. Then just tie the end off and head cement it and your good to go, you can also super glue some eyes on to it to make it even fishier.


Thanks, Hope you enjoyed the post, let me know if you have any questions, ill be happy to help you out.


My next post will be on my home river where I learned to fish, its always good to visit your roots.

Take care and Merry Christmas


Chris


Monday 17 December 2012

Wing Tapers

Hey Everyone,

So tonight I thought I would take some time and talk about tapering wings. I have found that a lot of tiers do not taper the hair or fur they use for wings. The taper in the wing is what gives the fly its profile. 

I tied these four flies tonight with both tapered wings and untapered wings. You can see how the tapered wing changes the look of the fly. Without a tapered wing the fly has a "blocky" look. as you can see a tapered wing blends the under and over wing together to make a more natural looking looking wing.

Non-Tapered

Tapered


Non-Tapered

Tapered 

In order to taper a wing all you have to do is simple pull out a few up the hairs so that they extend farther than the rest of the hair, you can either do this while holding the bunch of hair in your hand, or you can tie the bunch of hair in and the taper it on the hook. I prefer to taper it in hand, but to each their own. 

Later tonight I am going to experiment with making some dubbing brushes to tie some bait fish patterns


Thanks 
Chris


Wednesday 12 December 2012

Fly Tying Area

Hello Everyone, 

So I thought I would take some time and post about my fly tying area. I used to tie on a small glass desk ( the one pictured below), this served me pretty well until I started to tie flies commercially, then I needed a much larger space.


There are several things I was looking for when I settled on my new desk:
  • Space - I wanted to have plenty of space to lay materials out in order
  • Height - When tying dozens of flies at a time its really easy to get a sore back and neck
  • Lighting - Lighting is also extremely important, low lighting makes tying intricate flies very difficult and hard on the eyes
  • Location - I wanted to have my tying area in the living room (I can't believe my wife agreed to it) with my tying area in the living room I can easily put on a movie and just tie away. 


I chose an L shaped desk because I like the amount of space it offers and I find it very comfortable to tie on.


On one side of the desk I have a photo box where I take all of my fly pictures, I also set up my tube fly stuff on this side of the desk as well.


I just hung up 3 shadow boxes that I made up last week.


This is the corner of the desk, I have my vise, radio, 2 lamps, tools, head cement, and 2 boxes with beads and some eyes.


Shelf with printer, books, cork board


Here is where I store my material, I used to use to have all my material up on a cork board on the wall, but I found it to be more annoying because it became a pain in the butt to constantly be pinning material back up on the wall. In the future I may look into trying it again with peg board.


My tying companion, although sometimes she gets into the material...... so far only one calf tail and one grizzly hackle cape.........


Hope you enjoyed


Chris


Sunday 9 December 2012

Profile

Hey everyone,

So earlier today I was talking with a buddy about creating larger profiles with less materials.

Larger profiles with less materials have a couple of advantages:
  • Easier to cast - these flies tend to be lighter because there is less material to "grab" water. 
  • Sink faster - with less material there is less current and the flies will sink faster
  • Cost - less material equals less cost

This post will show several techniques that I use to create bigger profiles on my flies

The first technique is the "Dubbing Ball", it is a pretty simple technique to learn.
For a dubbing ball just spin the dubbing onto the tying thread and wrap it over it self. then tie in and wrap your next material tight to the ball. The ball will act as a "shoulder" and it will force the other material to stand up. My favourite material for dubbing balls is seals fur, I find it very easy to work with.

The second method is spinning material in a "Dubbing Loop" then I wrap it around the hook/shank
My favourite material for this Arctic Fox, I brush out the under fur from the tail and save it to use.


Another easy technique is to tie marabou in reverse, it forces the material to want to stand up and it creates a huge profile, there not exactly pretty flies, but they are effective.


Here are some examples of flies that are tied using these techniques


Olive Intruder


I like to wrap the head with rabbits fur to give the fly a cleaner look


White and Olive Intruder


Thanks
Chris


Friday 7 December 2012

Shadow Boxes

Hey everyone,

So lately I have been doing up some shadow boxes with some display flies for presents this Christmas

They make a great addition to a fly tying area. Its also a great way to track your progress as a tier.

This post will give you a Step by Step instruction on how I mount a fly in a shadow box


Here is the final product, all of these flies are freestyles except for the Jock Scott in the small frame


Basically all you need is a shadow box, knife or scissors, something to punch a hole through the back of the box (I use a tailors awl), some duct tape, some small tubing ( I use tube fly tubing), some fine thread, and of course your fly.


1: First I get my tubing set up with the fine thread going through it to create a loop
 ( shown in step 3).


2: I also like to cut a small notch in the tubing to give the fly something to sit in.


3: Here is a closer picture of the loop and small notch.


4: Choose the fly that you would like to mount, this is a freestyle that I tied up the other night.


4: Take your awl or needle and poke a hole through the back of the shadow box  in the approximate centre. Then slide your tubing with the thread through the hole you just created, I use a smaller tubing stuffed inside the large tubing for this part so that the tubing will fit through the hole.


5: Slide your fly into the loop that is sticking out of the tubing. try to choose a colour of thread that is the same colour as the fly so that it will not be noticeable.


6: When you pull the thread tight through the back of the shadow box it will tighten up on the fly and it will straighten out and it will appear to be "floating".


7: To secure the thread and tubing I just fold the tubing that is sticking out the back of the box flat and tape it and the thread with duct tape, this way you can still adjust the fly if it ever shifts.


So that's all there is to it, its pretty simple and they really look neat, 

Hope it was easy to follow, if you have any questions just shoot me an email or leave a comment and I will help you out!

I will be heading out on the water tomorrow to chase some Steelhead, I will be sure to let you know how I do.


Thanks


Chris


Sunday 2 December 2012

Tubes, Tubes, and More Tubes


Been busy tying up more tubes for Misty Mountian, I'm starting  to like tubes more and more, I went out yesterday and hooked into a really nice Steelhead on my Christmas Tree Tube, Unfortunately I didn't land the fish, and lost the fly... I will be tying up more of those for sure, its a great feeling when you get a fish on a new fly you have tied up.


Gotta love the look of those Turbo Cones and Jungle Cock eyes


I love Grizzly Hackle wrapped for my bodies, I think it gives the flies a drab, fishy look that is very effective on overcast days for me 


The wing is made on Wolf tail and Finnish Raccoon, and you cant forget some flashabou of course


For my next post I will be showing you how to mount flies in a Shadow Box.... Stay Tuned


Thanks

Chris

Wednesday 28 November 2012

Christmas Tree Tube

So I decided to try and tie up a sparse and gangly tube fly last night. I wanted the fly to have a very large profile with minimal material, to allow the fly to sink fast while keeping its profile.

I think the result turned out quite well, I will be getting this fly out for a test this week end. 


Love the look of the Amherst tail with the green Ostrich, it just looks fishy


I think I will try to tie this again and go for a fuller look. 


Thanks


Chris


Monday 26 November 2012

Wintruder Time

O winter how I love thee,

Woke up to some nice fluffy white stuff, which for us Steelhead Junkies means its time for our beloved Intruder to go for a swim.


Basically the "Intruder" is just a big fly that is meant to bring out the aggression in a fish. Since fish don't have fists to punch with, they resort to eating/biting the fly. There are hundreds of intruder patterns out there, each pattern is different, usually tied with specific fish and water in mind, but typically they are noticeably larger than traditional flies

If you have never taken a Steelhead or Salmon on a Intruder pattern it is worth trying it out, the hits/takes are often extremely aggressive and explosive and will leave you speechless with mass amounts of adrenaline pumping through your veins.

Here are several intruders that I call "Wintruders" I usually tie up a couple in different colours just in case the fish are picky.

Purple Wintruder


Black Wintruder (a favourite of mine, works very well in stormy weather)


Pink Wintruder


Hope you enjoyed the post, handle intruders with care, they can be very addictive to fish and tie, and because of their size and weight they can really hurt if you hit yourself with one on a cast............


Chris